In moodle 3.4, a “resource” is a content type on the main course page. To embed or link to files/media in your moodle page, you must first create a resource.
There are several ways to link to files and media using moodle resources:
- Upload a file (PDF, DOC, etc.) to Moodle (file resource)
- Link to an online file/web page (URL resource)
- Upload a media file to Moodle and link to/embed it (page resource)
- Embed an external media file in a page/label/html block (label resource)
Create/edit a resource
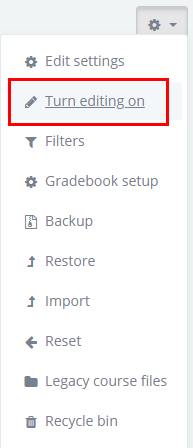
To create a resource, click the gear icon next to the right of the course title and select “Turn editing on”.
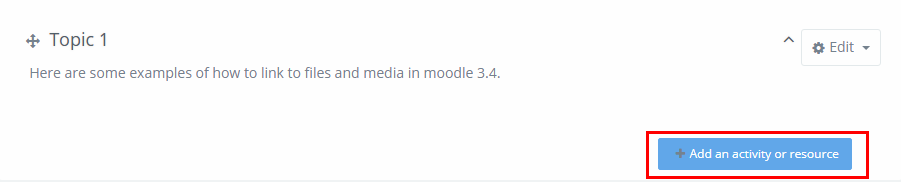
Navigate to the topic (or week) where you want the link to the file to appear, and click “Add an activity or resource”. Scroll down to the “Resources” section.
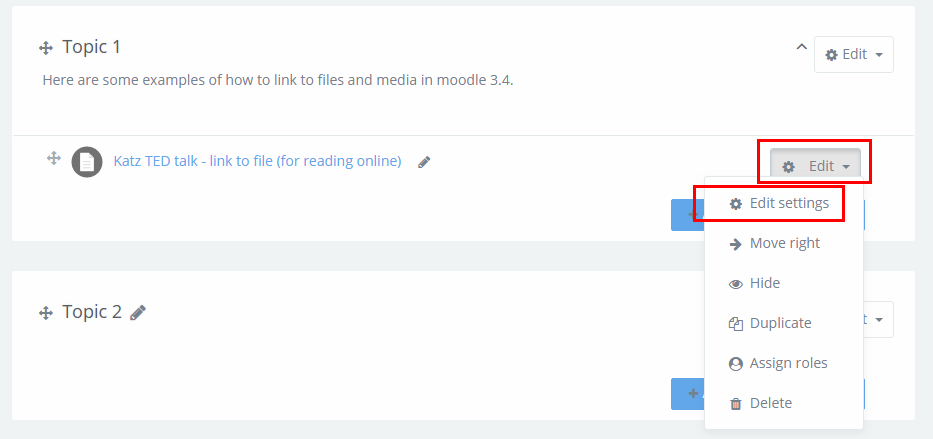
To edit any settings once a resource is created, click the gear/edit icon next to the resource and choose “Edit settings”. From this menu, you can also re-position, hide, duplicate, set privileges, and/or delete the resource.
Upload a file (PDF, DOC, etc.) to Moodle (file resource)
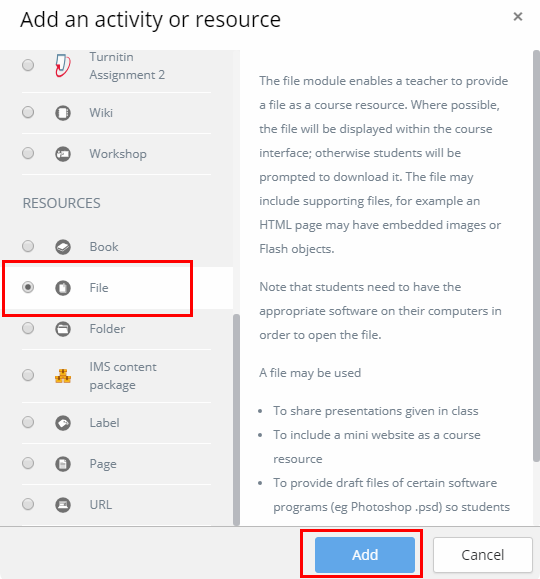
In the “Add an activity or resource” dialog, scroll down to “Resources” and select “File”. Click the “Add” button.
The resource settings page has five subheadings: General, Appearance, Common module settings, Restrict access, and Tags.
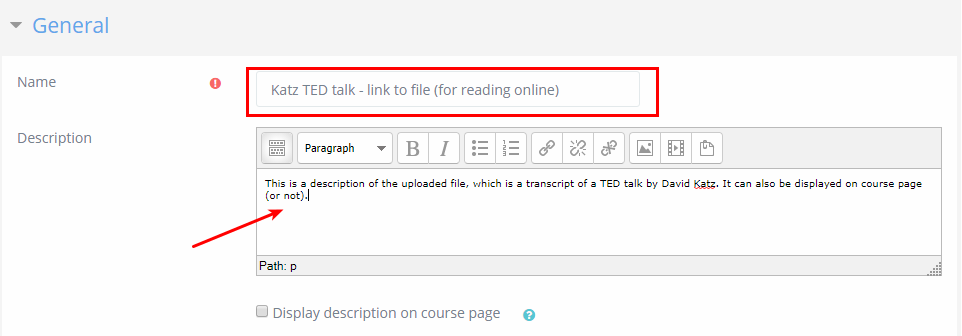
In the “General” block, you can
- set the name of the resource as it will appear on the course page,
- write a description of the resource that will appear on the resource page,
- choose whether to display the description on the course page as well, and
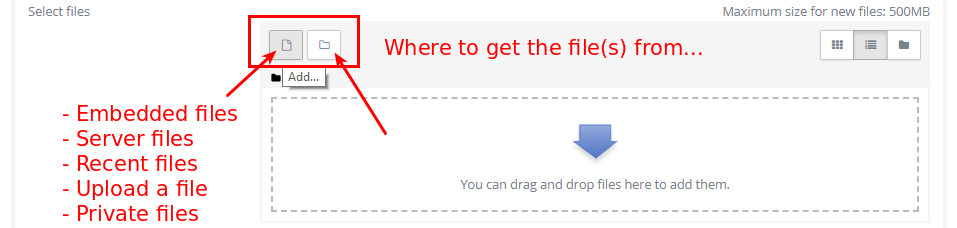
- upload or locate the relevant file by clicking the “Add” file icon.
In the file picker, there are a series of options repositories and locations to get files from, including:
- Embedded files – files already used in the text editor (not appropriate here)
- Server files – a file tree of all the files you have uploaded to your course
- Recent files – files you have used/uploaded recently
- Upload a file – files on your computer
- Private files – files you have uploaded to your 100MB of user storage space
- Wikimedia – searchable content from wikimedia that you can copy into Moodle
- Legacy course files: [Course Name] – a repository of files created if/when you restored your course from the old Moodle system (1.9).
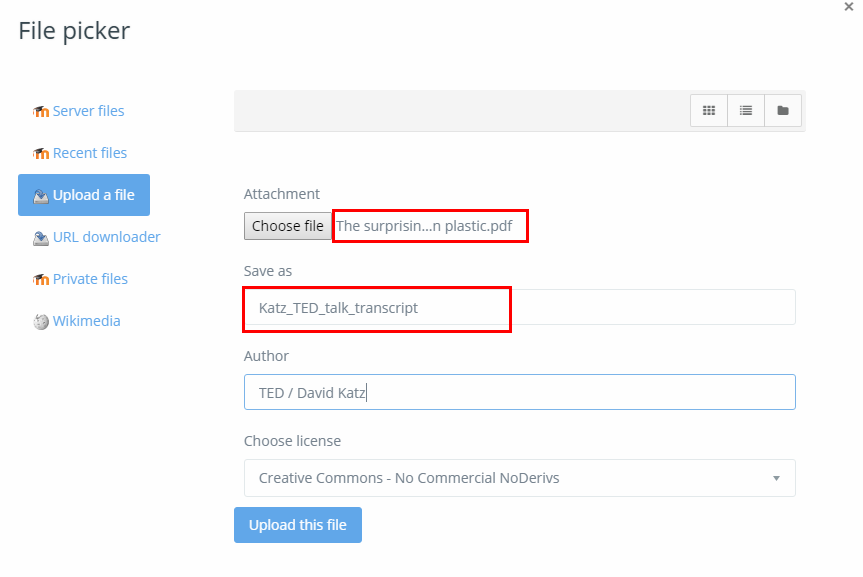
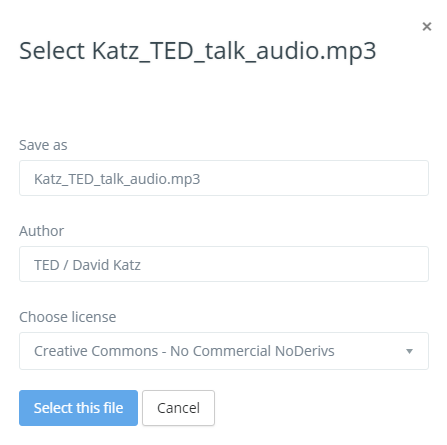
To upload a file from your computer, choose “upload” on the left menu, and click the “choose file” button to locate a file on your computer. Here, you can set a new name for the uploaded file, set the author (the default is your username), and choose a distribution license. The default license is “all rights reserved” for your own content, or the appropriate Creative Commons (CC) license for syndicated or shared content. Click the “Upload this file” button.
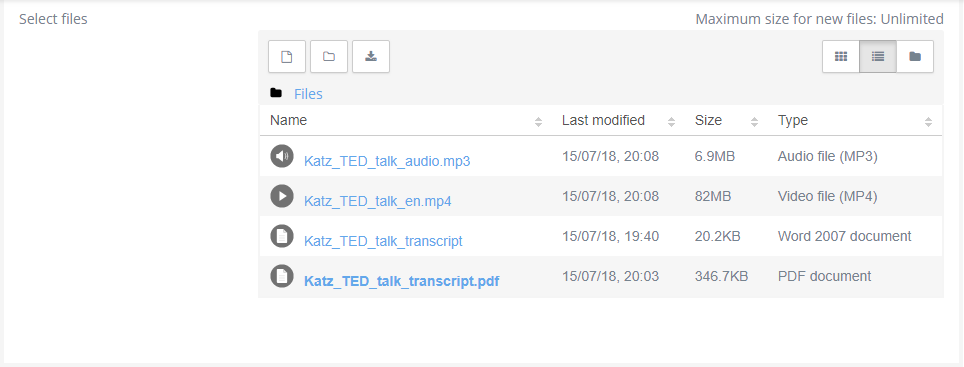
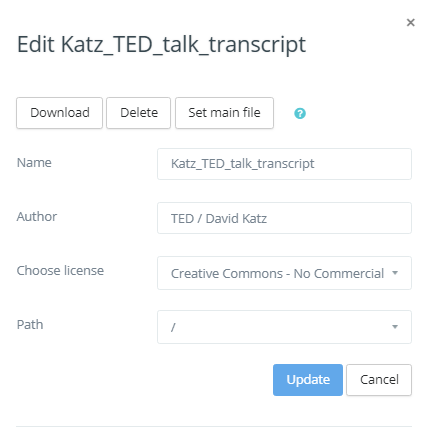
If you want to edit the file you uploaded, click on the link in the “Select files” window to open the file edit dialog. Here you can download or delete the file, and set the name, author, license and file path. If you have uploaded more than one file to this resource, click “set main file” to set which file students will link to (the main file is displayed in bold in the file window). Click the “Update” button to save your changes.
Normally, the options under the Appearance and Common Module Settings blocks can be left in their default values.
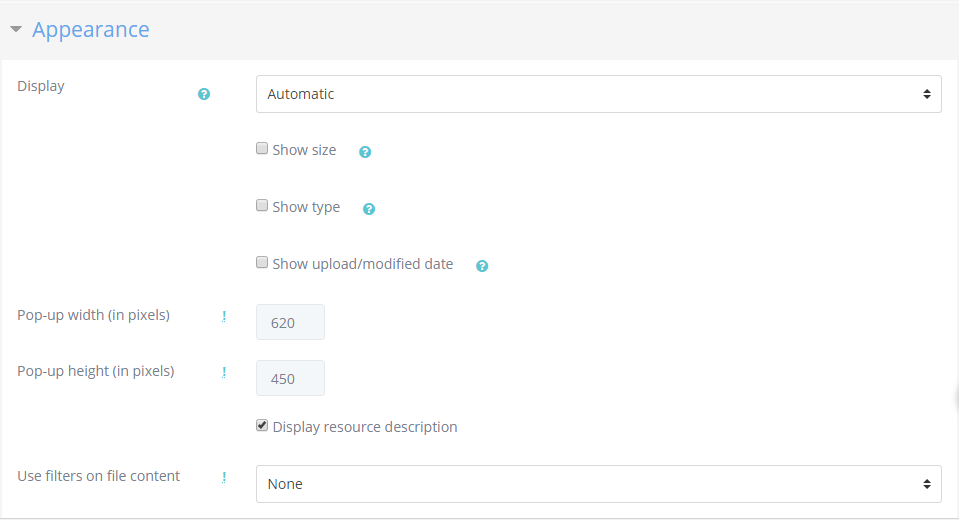
In the “Appearance” block, use the “Display” drop down to set what will happen to the file when the student clicks the link: the options are as follows:
- “Automatic” – whatever the system decides is probably supposed to happen to the file, e.g., “open” for .pdf or “download” for .docx
- “Embed” – the file is displayed embedded in a Moodle web page
- “New window” – will open the link in a new browser window
- “Force download” – a file will download to the students’ computer (useful if you want them to edit the file)
- “Open” – will open the file in the same browser window
- “In pop-up” – will open the file in a new fixed-dimensions “pop-up” window (n.b., “embed”, “open” and “in pop-up” work best for .pdf or audio/video/image files. With .doc, .odt, or other editable files, a blank frame will display and the file will automatically download). In this block, you can also choose to display the file-type, size and upload/modified date. Click the “Show more” link to access advanced options that allow you to set the dimensions of any pop-up window and show/hide the description on the resource page.
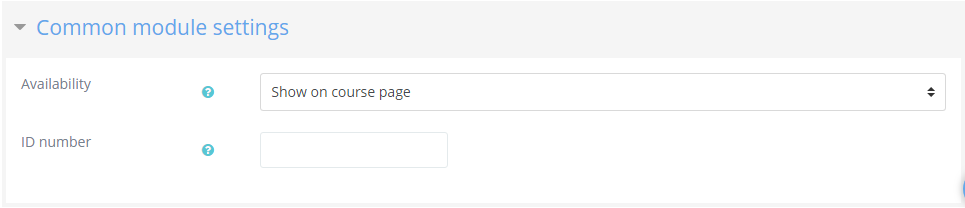
The “Common module settings” block include the availability (either “show on course page” or “hide from students”) and the gradebook ID number (if any).
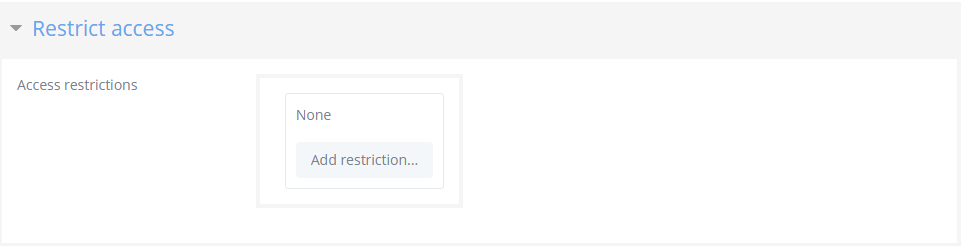
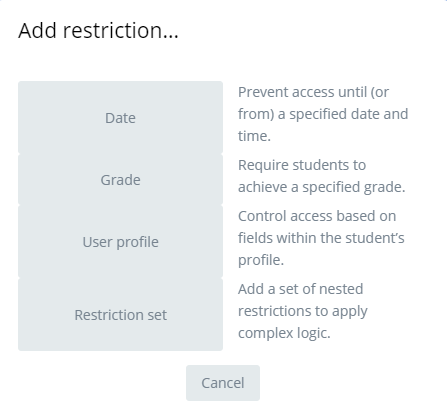
In the “Restrict access” block, click the “Add restriction” button to open the dialog and hide the resource from users due to the date, their grade, their user type, or some combination of these.
In the “Tags” block, you can type or choose any tags that will help to categorize this resource in searches. Find out more about using tags to organize content at the links below:

Click the “Save and return to course” button at the bottom of the page to save your changes and view the link to your file resource on the course page.

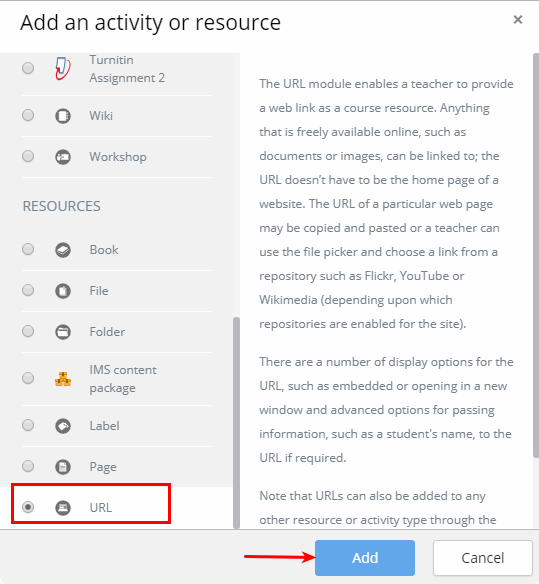
Link to an online file/web page (URL resource)
In the “Add an activity or resource” dialog, scroll down to “Resources” and select “URL”. Click the “Add” button.
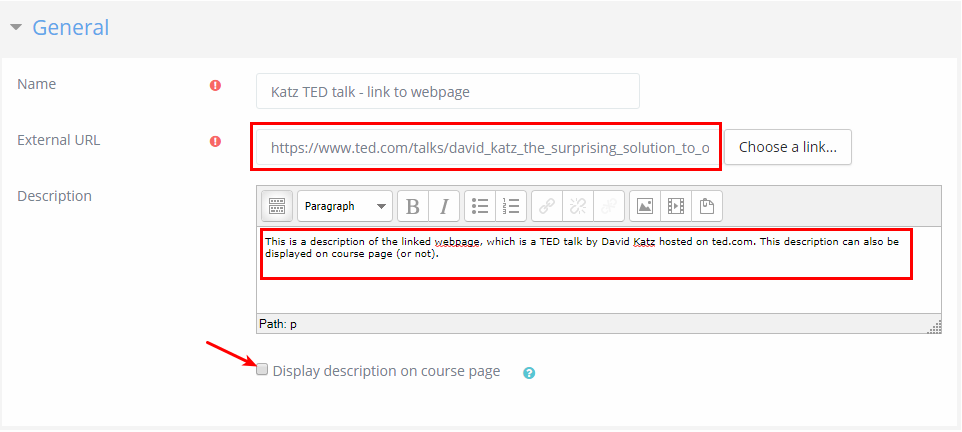
In the “General” block, you can
- set the name of the resource as it will appear on the course page,
- type or copy/paste the URL of the page you want to open (http://…),
- write a description of the resource that will appear on the resource page, and
- choose whether to display the description on the course page as well. Click the “Choose a link” button to access available repositories:
- “Embedded files”
- “URL down loader” – paste a hyperlink to an online image file (.jpeg, .png, etc.) to download it directly into Moodle
- Wikimedia
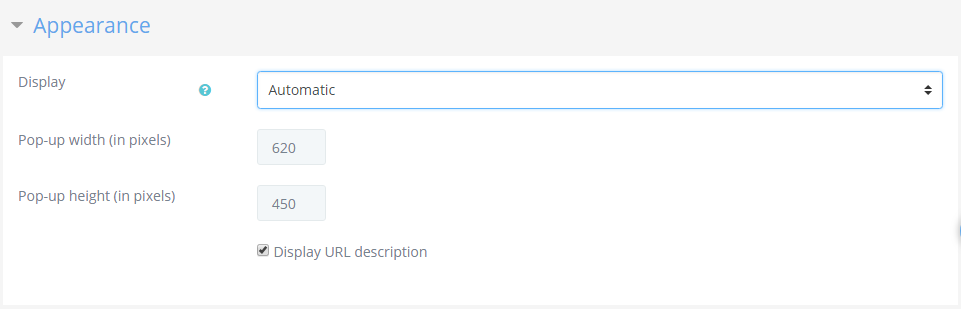
In the “Appearance” block, use the “Display” drop down to set what will happen to the file when the student clicks the link: The options are as follows:
- “Automatic” – whatever the system decides is statistically the best display option for the file, i.e., usually “Open” for hyperlinks
- “New window” – will open the link in a new browser window
- “Open” – will open the link in the same browser window
- “In pop-up” – will open the file in a new fixed-dimensions “pop-up” window. In this block, you can also choose to set the dimensions of any pop-up window and show/hide the description on the URL page.
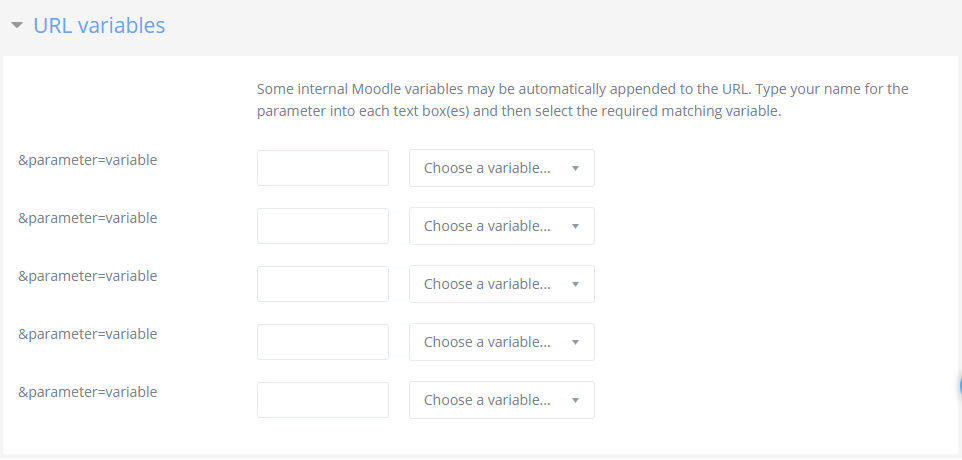
In the “URL variables” block, you can choose to append internal Moodle variables to the URL when it is clicked. This is useful if the URL is a script or interactive web page that takes parameters, and you want to pass something like the name of the current user, for example.
Click the “Save and return to course” button at the bottom of the page to save your changes and view the link to your URL resource on the course page.
Upload a media file to Moodle and link to/embed it (page resource)
In the “Add an activity or resource” dialog, scroll down to “Resources” and select “Page”. Click the “Add” button.

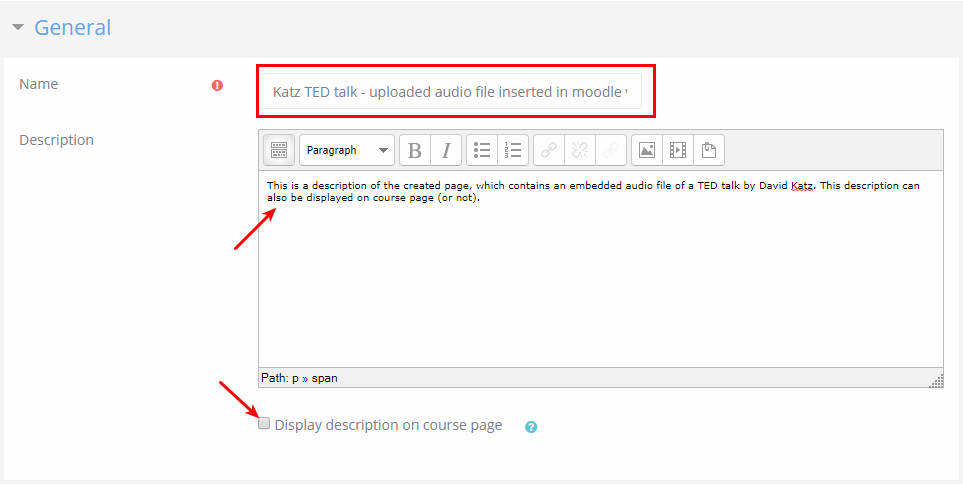
In the “General” block, you can
- set the name of the resource as it will appear on the course page,
- write a description of the resource that will appear on the resource page,
- choose whether to display the description on the course page as well.
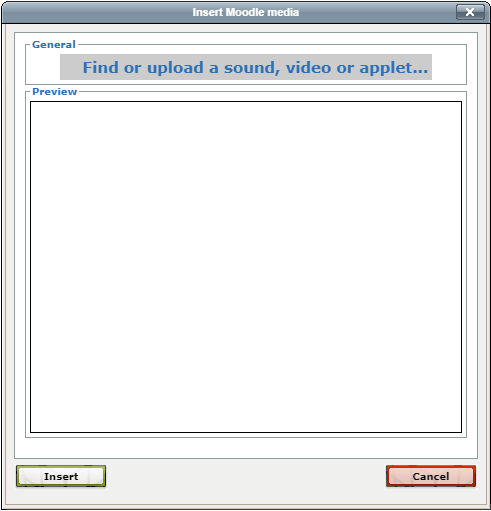
In the “Content” block, you can embed a media file into your page as follows:
- click the “Insert Moodle media” (film) icon;

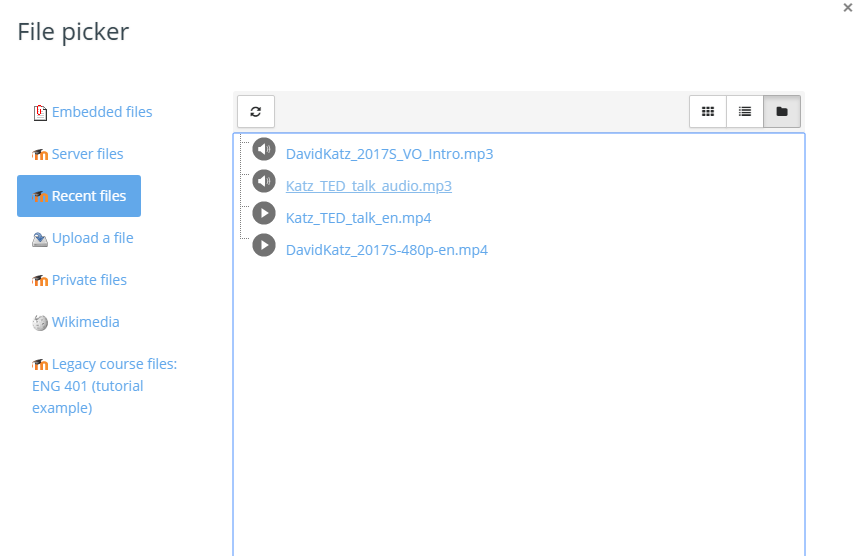
- in the dialog, click “Find or upload a sound, video, or applet…”;
- use the “File picker” to locate the media file (here, I am using the “recent files” option on the left menu to locate the different formats of Katz’s talk I uploaded in just recently);
- set/confirm the options in the select file dialog;
- preview the media file in the dialog that appears and click the “Insert” button;
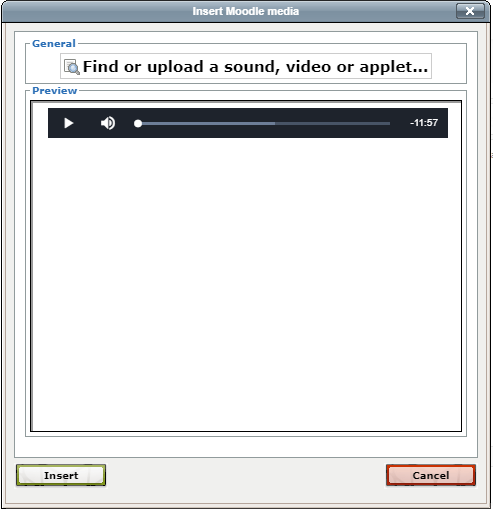
- view the link to the embedded content (in blue) in the body of your page, which will be replaced by an appropriate media player/viewer when the page is viewed. You can now add content around the link to finish the page.
“Appearance” and remaining blocks are similar to the ones previously explained on this page.
Click the “Save and display” button at the bottom of the page to save your changes and view your page resource.
Embed an external media file in a label/page/html block (label resource)
This tutorial includes two ways to embed video/ media players in your Moodle page: using the URL/sharing link or using HTML embed code. Both ways work in Moodle labels, pages, and HTML blocks, but the tutorial explains how it is done in a label on the course main page.
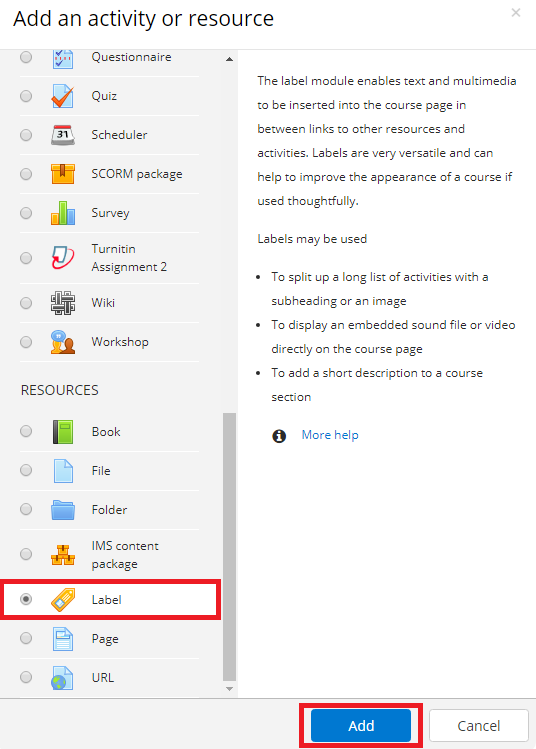
- In the “Add an activity or resource” dialog, scroll down to, e.g., “Resources” and select “Label“. Click the “Add” button.
Using the Video URL
To embed an external player in the label text using the video URL:
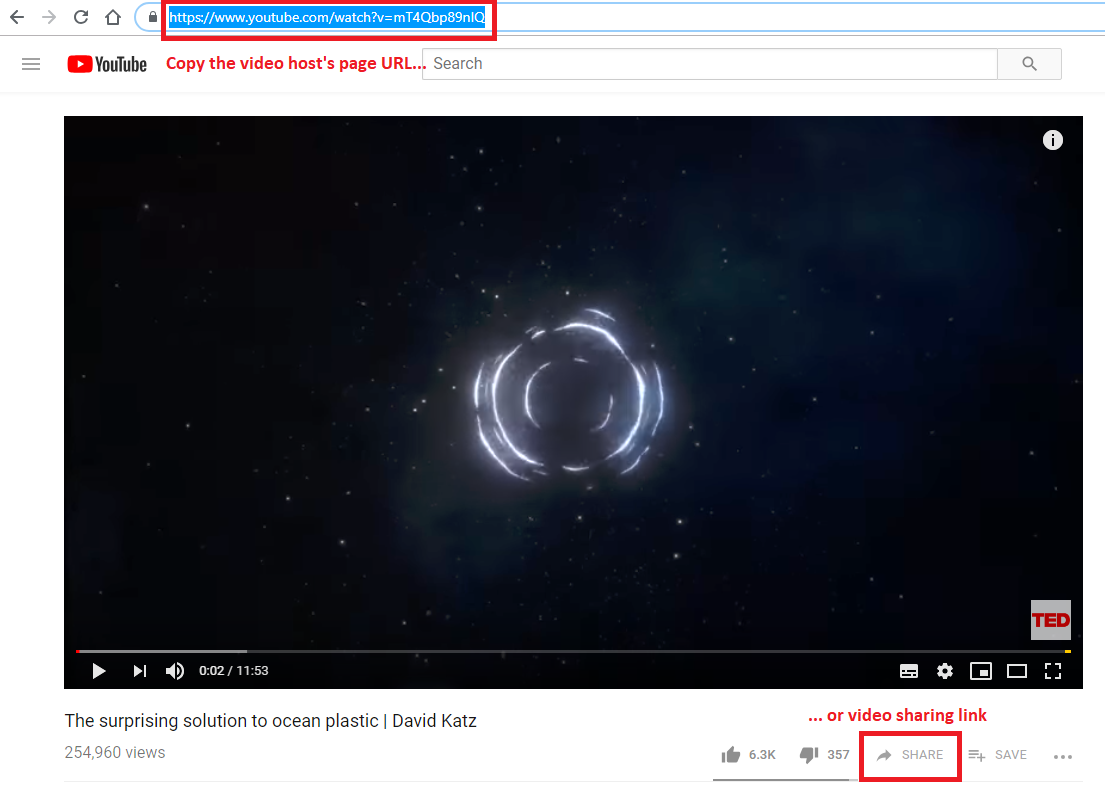
- copy the video URL (or “sharing link”, etc.) from the video hosting service
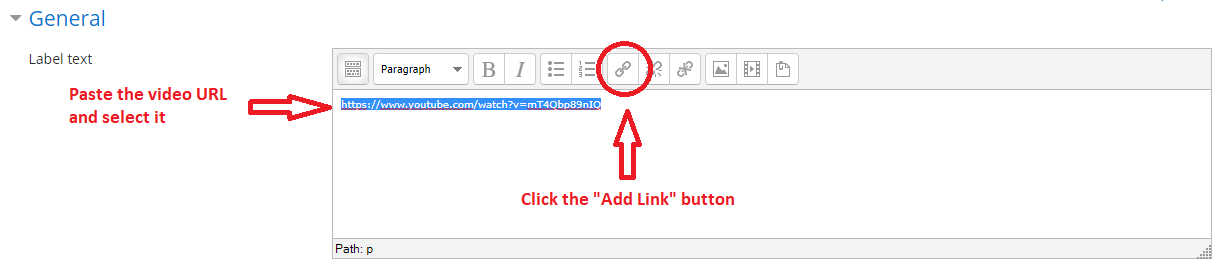
- In the “General” tab of the label, paste the URL/sharing link, select it, and click on the “insert link” button in the editor:
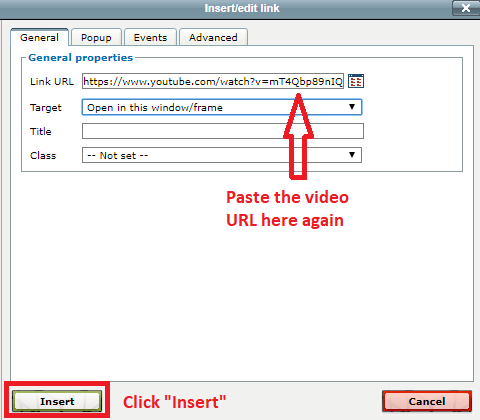
- In the “Insert/edit link” dialog, paste the URL/sharing link into the “Link URL” field. Click the “insert” button:
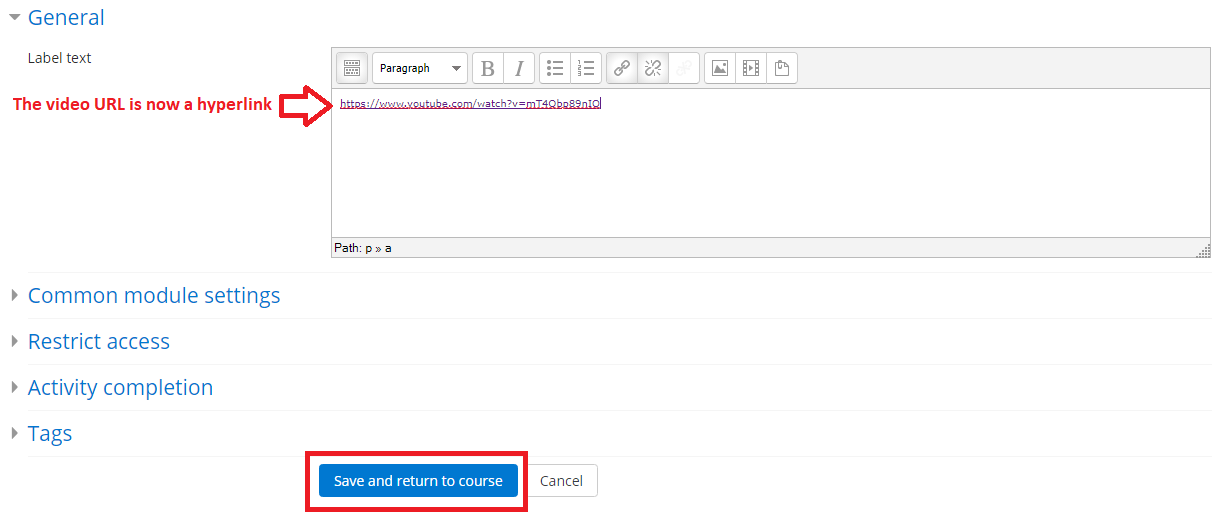
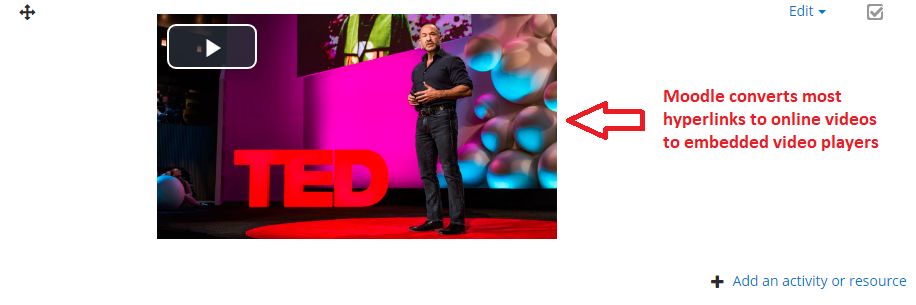
- Check that the video URL is now an active hyperlink (it will be underlined and blue/purple). Click “Save and return to course”:
- On the main page, the link you inserted will be converted to an embedded video player by Moodle.
Using HTML Embed Code
To embed an external player in the label text using HTML embed code:
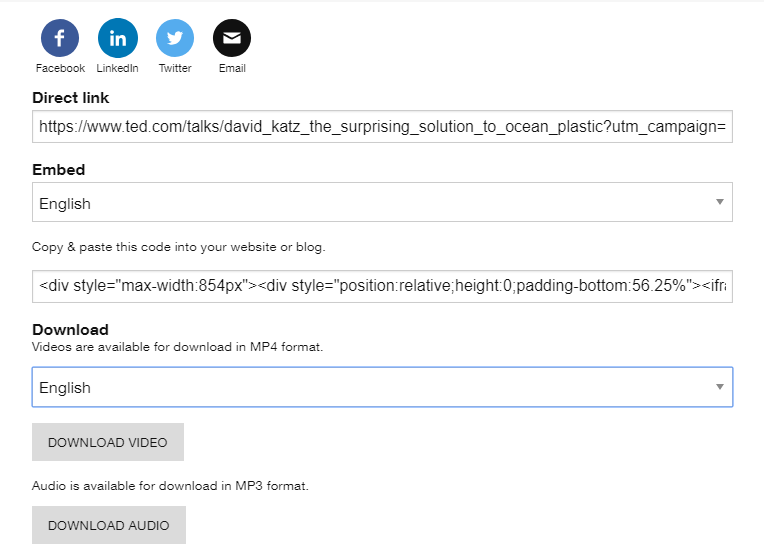
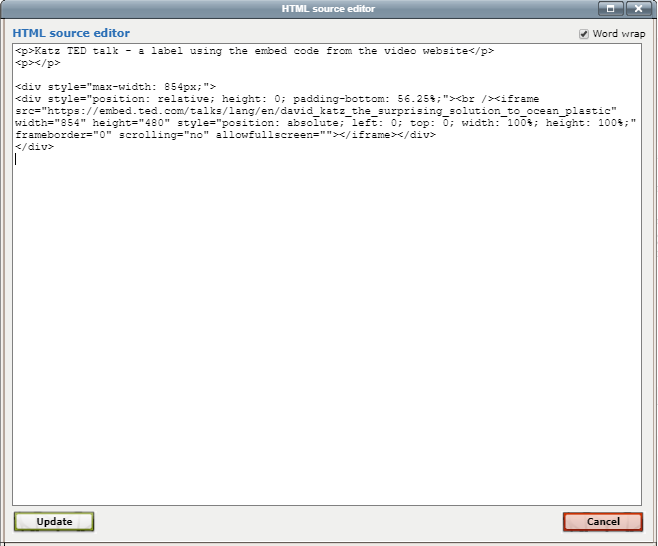
- copy the embed code from the external hosting site (e.g., ted.com, youtube.com, dailymotion.com, etc.);
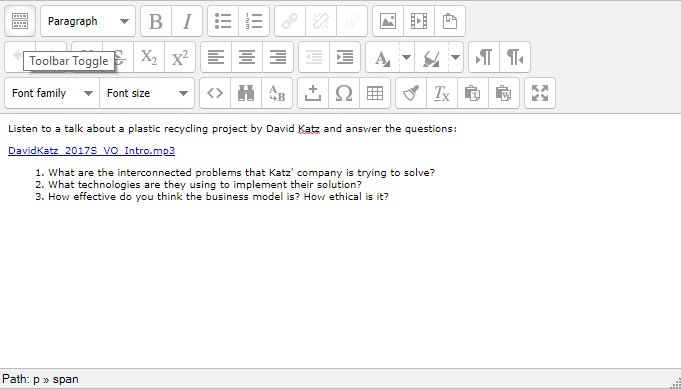
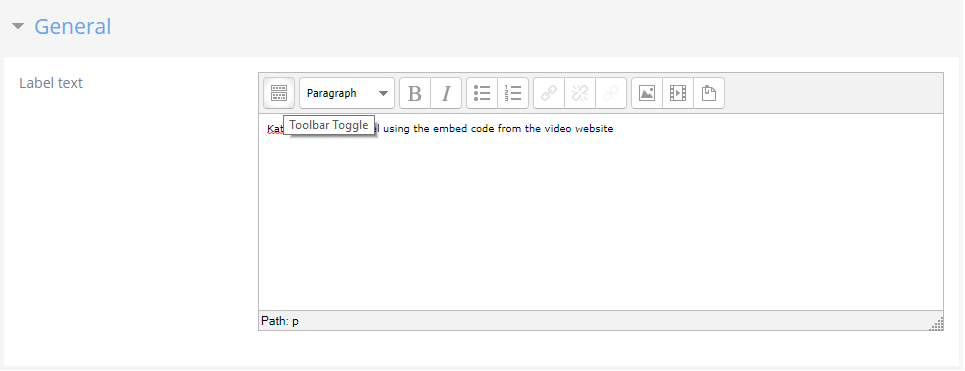
- In the “General” tab of the label, press the “Toolbar toggle” button to reveal all the options in the text editor
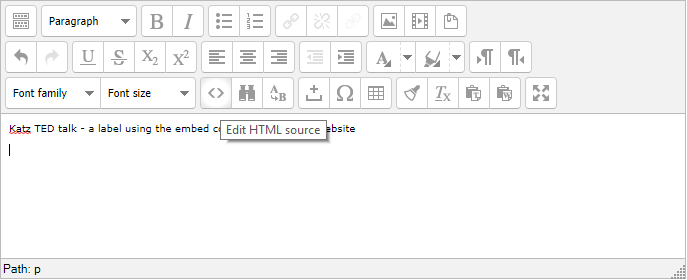
- press the “edit HTML source” (<>) to open the HTML source editor;
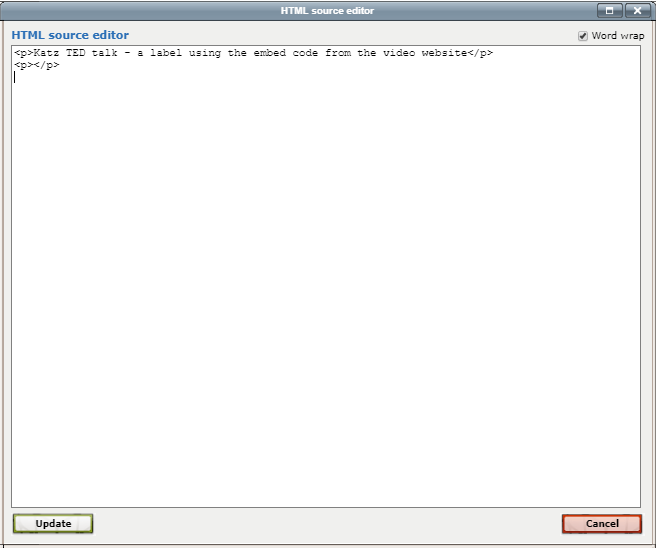
- paste the code into the editor and press the “update” button;
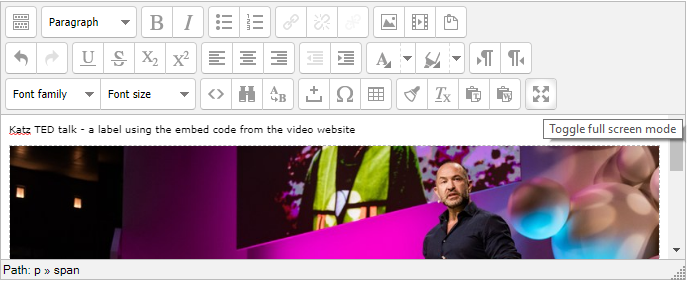
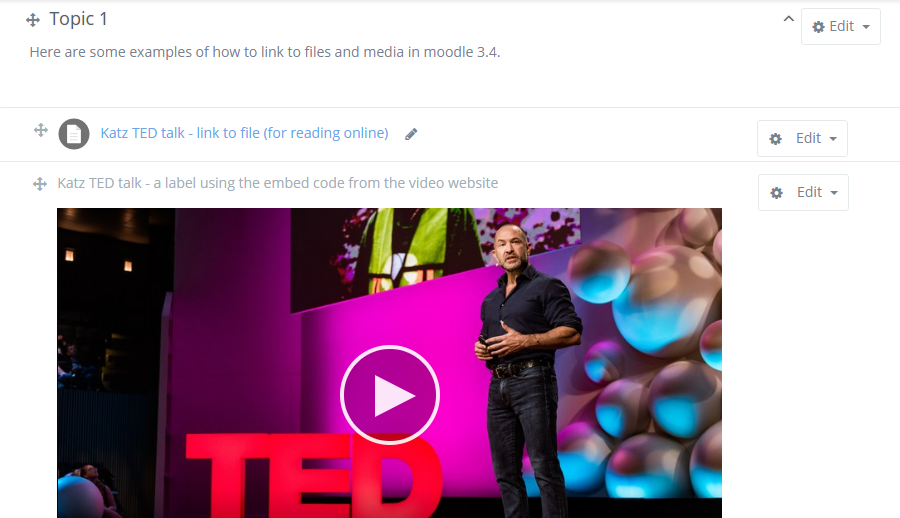
- view the embedded video player in the label (or page or block) text. You can use the “Toggle full screen mode” button to view/arrange the whole embedded player.
“Appearance” and remaining blocks are similar to the ones previously explained on this page.
Click the “Save and return to course” button at the bottom of the page to save your changes and view your label resource on the course page.